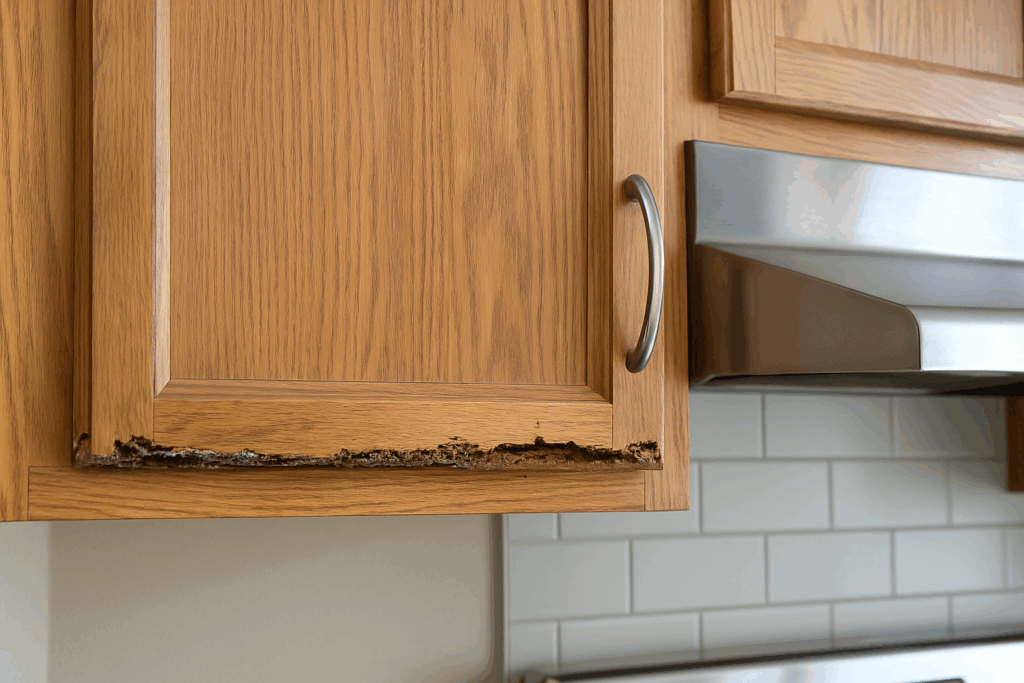
A thorough planning phase is the foundation of any effective bathroom renovation. Reflect on what you’d like to change in the current bathroom layout, what budget you’re working with, and what finishes you’d like to see in a refreshed space. Weighing these factors clarifies your vision and makes a bathroom remodel go smoother.
While having a plan is a must, developing one can be a challenge. Based on over 30+ years of hands-on experience and thousands of accomplished projects, we’ve compiled a crafted checklist that’ll guide you every step of the way.
Read on to learn planning and budgeting tips, explore efficient bathroom renovation tips, ways to finalize design and layout, common mistakes to avoid, and more.
Planning and Budgeting
A little financial preparation and planning go a long way in making your bathroom remodel smooth and stress-free. Before diving into materials and design choices, follow these key steps to stay on track:
- Set your budget wisely: Before starting your project, decide how much you’re comfortable spending. Be sure to include a 20% buffer for those unexpected surprises that often come up during renovations. This way, you can keep your project bathroom renovation cost under control without sacrificing quality.
- Be realistic about your timeline: A well-planned remodeling timeline keeps things running smoothly. Account for everything — demolition, material deliveries, contractor availability, and even possible permit delays. Having a realistic schedule makes it easier to coordinate different specialists and avoid unnecessary stress.
- Compare contractor quotes: Get estimates from multiple licensed contractors before committing. Look at their pricing, timelines, and past work to find a reliable professional who fits your budget and vision. This extra research can save you from headaches down the road.
- Prioritize what matters most: Make a list of must-haves vs. nice-to-haves for your new bathroom. This helps you stay within budget while ensuring the most important upgrades get done first. If adjustments are needed, you’ll already know where to cut back without compromising the essentials.
Design and Layout
Get the design for your remodel nailed from the start to move through the other steps with a clear head. If you’re struggling to visualize your dream space, start browsing the web for inspiration.
Platforms like Pinterest and dedicated architectural design magazines, such as Architectural Digest, are great for getting bathroom design ideas. You can also look at the realized projects of professional companies. Create a special folder on your device and download photos of the interior design elements you’d like to incorporate in your bathroom renovation.
With creativity sparked, get your hands on genuine materials. Visit a physical store to get a better understanding of what some of the fixtures and tiles look like. Consider how the natural light illuminates your space and what would look best in your dwelling and move from there.
Once the design choices have been settled on, project your vision onto the layout of your space. Does the current layout allow for your vision to be implemented smoothly? Or, conversely, are there any structural obstructions you’d need to handle before the cosmetic part of the renovation begins?
At this stage, consider getting professional assistance from a skilled contractor to get the blueprint for a bathroom remodel. This way, you’ll keep costly pivots to a minimum.
Permits and Regulations
Whether you need to gather permits from local building departments depends on the scope of the planned renovation. The International Residential Code (IRC), which is widely adopted across the US, outlines permit requirements for various home remodeling projects. However, specific rules vary by state and municipality.
In most cases, if you’re starting a minor cosmetic makeover, you are good to go without permits. This means you can add lighting fixtures, replace faucets, paint bathroom walls, and resurface countertops without any extra regulatory oversight.
More complex structural redesigns of your space typically require a permit. For example, if you want to relocate plumbing fixtures, such as a toilet or a bathtub, you must get a plumbing permit before remodeling the space. Thus, you’ll comply with the Uniform Plumbing Code (UPC).
Alongside plumbing alterations, permits are required to upgrade electrical systems and modify the structure of the bathroom. For example, if you plan to knock down the internal walls, reinforce current flooring, and upgrade the ventilation system in your space, seeking approval is the first thing on your bathroom remodel checklist.
Demolition and Preparation
For most homeowners, a refreshed look for their bathroom space means switching the layout. And it comes with some dusty reconstructions. If you’re looking to add a more spacious feel to your bathing area but an internal wall hinders the process, knocking it down could be a solution.
If it’s a non-load-bearing wall, i.e. one that simply separates the space without adding a critical layer of structural support, demolishing it can be relatively straightforward. However, load-bearing structures require more time, effort, and specific permits to get deconstructed.
When tackling a DIY bathroom renovation, prioritize safety measures and protective equipment. With things flying and rusty nails sticking out of old wood beams, getting injured is easier than it seems. Get your safety gear ready: gloves, safety goggles, earplugs, and hard-soled shoes will be a must.
Plumbing and Electrical Work
If you plan to relocate the shower lines or swap the existing ones, there’s a bit of preparation that comes beforehand. First, you must contact the inspector to sign off the special plumbing permit confirming that modifications align with established regulations.
The same is true for electrical work. Such changes to your home’s electrical system as adding extra outlets, upgrading the electrical panel, installing a backup generator, and rewiring parts of your space must be approved.
If you’re still confused about whether your bathroom redo project calls for a special permit, it’s better to consult reputable official sources. If you’re a homeowner in Austin, Texas, for example, consider the Do I Need A Permit? tool by the City of Austin Development Services Department to determine if your project has to be approved and what needs to be done based on your jurisdiction and property type.
Wall and Floor Installation
Once the preparation is done — obstructive partition walls demolished, necessary permits signed off, and plumbing and electrical work completed — it’s time to proceed to a more creative phase of your bathroom remodel.
Wall work might seem an easy part. Yet, it’s about getting things in the right order. First, decide what you’d like your walls to look like. Would you prefer having some painted, tiled, or covered in vinyl wallpaper? Let’s consider each option separately:
- Painted walls: High humidity in the bathroom means you should take the preparation of the surface seriously and select the proper materials. Start by cleaning the walls from soap scum, product residue, and any grime build-up. Next, opt for what’s known as bathroom paint. It has mold-inhibiting agents and creates a water-resistant surface.
- Wallpaper: To make wallpaper work for your bathroom renovation project, dry clean the surface before installation. Then, address any imperfections for smooth application. Consider running the dehumidifier in the room in the first 24 hours after installation to ensure the best grip on the surface.
- Tilework: With this option, you’ll have to be more patient. Tiling your walls (and floors) is time-consuming. If you go for a DIY project, plan ahead and decide how you’ll tile the corners and angles to avoid excessive cuts. The process starts with covering the walls with a pan liner — a waterproof barrier. Then, the cement layer gets on top. You should opt for tiles with water-resistant and anti-crack qualities.
Tiling is the most common route for bathroom flooring, too. Once you do a good job tiling the surface, you’ll enjoy easy-to-maintain finishes that’ll last for years. How do you get to reap such results?
The process looks similar to tiling the walls. However, there are a few noteworthy differences. First, prepare the subfloor before any installation and apply a waterproof barrier to the surface. Then comes the insulation layer — a critical step for a sustainable bathroom remodel. Next, lay down the heating mats and additional waterproof membrane. As a final step before tiling your bathroom floor, apply a thin-set mortar.
Fixture and Cabinet Installation
If you followed our bathroom renovation tips and haven’t skipped the planning step, deciding on fixtures and pieces of furniture to go with the aesthetics of your space will be straightforward. You can shop for faucets, sinks, vanity tops, cabinets, and anything in between online or in a physical store. Remember that the latter is the safer option if you’d like to see how the pieces you plan on having in your space look in real life.
Plus, give yourself a moment to reflect on what fixtures to install to maximize the functionality of your space. Are you more inclined to have a single or double vanity, a floating or pedestal one? Is your space illuminated well? Does it make sense to invest in extra light fixtures? Consider your options and weigh their relevance to your bathroom layout before committing to a purchase.
Always prioritize functional bathroom storage solutions. Think about installing a few floating shelves and screw-in or adhesive hooks to maximize vertical space. Look for stackable baskets, bins, and containers to store hygiene products, towels, and toiletries.
Finishing Touches
Accessorizing the 90%-done bathroom remodel is one of the most enjoyable steps in the process. Beyond aesthetics, the right finishing touches enhance both functionality and comfort.
At this stage, small, thoughtful additions make a big impact. You might want to install soft-close hinges on cabinets, upgrade to dimmable lighting for ambiance, or add heated towel racks for a touch of luxury. These final tweaks help elevate the space while maintaining practicality.
Common Mistakes
Below are the most common renovation mistakes to avoid with your bathroom remodel:
- Lack of thorough planning: A plan will get you toward your dream bathroom. Failing to prepare one will make the process more difficult, with costly pivots and design errors taking the joy away from the experience.
- Absence of necessary approvals: Depending on the scope of the renovation, you’ll need some kind of permit to get electrical, plumbing, or building work done.
- Poor floor insulation: Uninsulated floors keep your feet cold and drain your financial resources. A nicely insulated flooring is a critical step in making your remodeling project sustainable.
- Insufficient storage solutions: Though you might opt for an ultra-minimalistic design for your space, remember to keep it functional as well. The lack of storage makes managing a bathroom space much harder.
- Hasty tiling process: Don’t rush the tiling process. Take it one step at a time with preparation, insulation, heating, and everything in between to get the best results.
Conclusion
A step-by-step washroom redo can be a rewarding experience. As mentioned, having a comprehensive plan in place streamlines the process and ensures the best possible results. However, a full-scale bathroom remodel requires commitment. That’s where professional assistance could become invaluable.
Frequently Asked Questions
What are the essential steps in planning a bathroom renovation?
The key steps in planning a bathroom makeover are finding design inspiration, settling on the layout for your space, negotiating the budget range, setting a remodeling timeline, and researching options for materials. With these aspects planned, you’ll have a clear vision of how to move on with the renovation.
How long does a typical bathroom redo take?
Typically, a bathroom redo takes anywhere from three to eight weeks to complete. The broader the scope of work you plan on having done, the longer the process will be.
However, for those looking for a fast and efficient upgrade, a one-day bathroom remodel is absolutely possible! With the Statewide Remodeling team, you can transform your space as quickly as 24 hours.
Do I need a permit for my bathroom remodel project?
Yes, if you want to implement some structural reconstructions to your space, you’ll need a building permit. The same is true for extensive plumbing and electrical work. Also, if you plan to demolish the internal walls, reinforce the current flooring, or upgrade the ventilation system, ensure you have the relevant permits ready, too.
Should I hire a professional or do a bathroom makeover myself?
For smaller updates, a DIY approach can be a rewarding and cost-effective option. However, a full-scale project requires careful planning, the right skills, and significant time investment.
With expert guidance, you can also explore options like a one-day bathroom remodel, where skilled specialists handle everything efficiently with minimum disruption to your routine. Contact Statewide Remodeling for a free consultation and discover how to bring your vision to life with ease.
What are the common mistakes to avoid during a bathroom renovation?
The most common trap to avoid during bathroom remodeling is poor planning. Without a clear vision of what you’d like your space to look like, finding an optimal approach to a bathroom makeover is a challenge.